It had been… {looks at watch}… over 5 years since my last commit to this project! (Check out a demo video from back then.)
Life got very busy and, frankly, I felt like the coding reached a point where it was more about building on top of existing scaffolding (e.g., more monsters, spells, maps…) rather than creating new functionality. (That being said, Reinforcement Learning to teach combatants to operate optimally is still a high priority.) Many things, however, have changed in the intervening years, including code generation. As such, I’m reviving Mortal Wayfare to see how these new tools might help me push this forward.
- Reinstall Android Studio: It had been so long there was no way to automatically update. ChatGPT helped me through this.
- Get the project to compile: Here, again, my gradle was so outdated it took a series of steps to get everything up and running. Gemini, built into Android Studio, helped me here.
- Get the game running on my Google Pixel Fold: Gemini helped me here, too, and it worked! Although there are lots of bugs, old and new. For example, the game only works when I have the phone unfolded and rotated 90°. Also, when you click the ‘enter command’ bar the soft keyboard covers the entire text area and you can’t see what you’re typing. This was not a problem years ago.
- Install Claude Desktop and Code, with the command-line interface (CLI): The former is a lot like the website but the latter is something else entirely.
I started off by asking Claude Code to give me an overview of my project.
 Can you give me an overview of this project?
● Explore(Explore project structure)
  ⎿ Done (27 tool uses · 50.0k tokens · 53s)
  (ctrl+o to expand)
● Mortal Wayfare - Project Overview
  Mortal Wayfare is a custom-built, old-school 2D turn-based RPG for Android, based on the Pathfinder tabletop rule system. It's built entirely from    scratch without a game engine.                                                                                                                                                        ---
  Core Concept
  Dungeon exploration and tactical combat with character creation, spellcasting, feats, NPCs, and quests on tile-based maps.
  ---
  Architecture
  The project uses a custom Android game engine with:
  - MapView — Custom SurfaceView rendering a 100x100 tile world
  - GameLoop — Dedicated render thread
  - GameApp — Singleton application managing all global game state
  - Combat — Turn-based combat with initiative, AoO, and action sequencing
  - Map — Handles pathfinding, line-of-sight, and entity management
  ---
  Package Structure (~175 Java files across 13 packages)
  ┌────────────────┬────────────────────────────────────────────┐
  │     Package      │                   Purpose                      │
  ├────────────────┼────────────────────────────────────────────┤
  │ main/            │ Core engine, rendering, input, UI              │
  ├────────────────┼────────────────────────────────────────────┤
  │ being/           │ Player and creature classes                    │
  ├────────────────┼────────────────────────────────────────────┤
  │ commands/        │ Action system (move, attack, cast)             │
  ├────────────────┼────────────────────────────────────────────┤
  │ effects/         │ Status conditions (dying, stable, poisoned…)   │
  ├────────────────┼────────────────────────────────────────────┤
  │ feats/           │ 60+ character abilities                        │
  ├────────────────┼────────────────────────────────────────────┤
  │ spells/          │ 11 spells implemented                          │
  ├────────────────┼────────────────────────────────────────────┤
  │ equipment/       │ Weapons, armor, items                          │
  ├────────────────┼────────────────────────────────────────────┤
  │ background/      │ Terrain tile types                             │
  ├────────────────┼────────────────────────────────────────────┤
  │ npc/             │ Non-player characters                          │
  ├────────────────┼────────────────────────────────────────────┤
  │ char_generation/ │ Character creation with dice rolling           │
  └────────────────┴────────────────────────────────────────────┘
  ---
  Key Features
  - Dice-based character creation (6 abilities, "bag of dice" method)
  - 30+ commands (movement, combat, spells, social)
  - Fog-of-war / line-of-sight visibility
  - Serialization-based character save/load
  - Text command interface with slash commands (/help, /maps, /load)
  - Pinch-to-zoom and drag-to-pan on the map
  ---
  Tech Stack
  - Language: Java (minimal Kotlin)
  - Min SDK: 21 (Android 5.0) / Target SDK: 34
  - Libraries: AndroidX AppCompat, LocalBroadcastManager
  - Persistence: Java object serialization
  - Graphics: Canvas/Bitmap on SurfaceView
  ---
  Current status: v0.12 alpha, actively developed.
That’s a decent overview, but I then asked Claude if it could analyze my codebase and write detailed observations about the most technically interesting aspects. I’ve tried to blog a little bit about those in the past but haven’t really shared much. The output below is long, and frankly I don’t remember much of it, but here is what Claude had to say with only edits for formatting:
Mortal Wayfare: Technical Deep Dive
In March 2013, armed with an “Introduction to Android” bootcamp and roughly 20 years away from writing serious code, I set out to build an old-school 2D RPG for Android from scratch — no game engine, no Unity, no Unreal. The goal was never the destination; it was the journey. A chance to find out if I still had it after years on the business side of the software world. The answer, ~14,200 lines of Java later, is yes.
What follows is a look at some of the more technically interesting things going on under the hood.
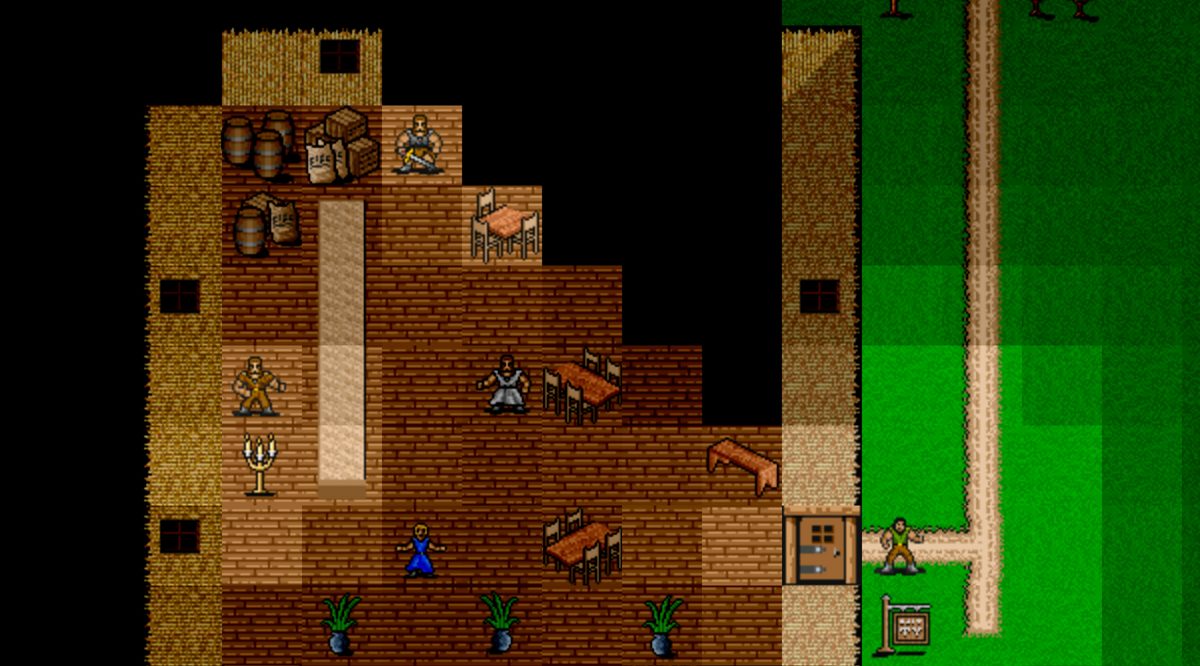
The game interface
The UI is split into two zones. The upper portion is the map — a 100×100 tile world rendered on a custom SurfaceView. You can pinch to zoom in and out and drag to pan. A short tap moves the hero toward the tapped tile; a long press on any visible tile examines it (the game enforces this — you can’t examine what you can’t see). Long-pressing a creature brings up a contextual panel showing its stats and a list of available commands, like Attack, depending on the situation.
Below the map is a scrolling text area that provides a running commentary — damage rolls, initiative order, spell effects, item descriptions. Below that is a command line for slash commands (/help, /maps, /load, /battle and more), giving the game a hybrid touch/text-adventure feel that suits the old-school aesthetic.
Line-of-sight: precomputed visibility with symmetry unfolding
The visibility system is the most algorithmically interesting part of the codebase. Rather than computing line-of-sight at runtime using raycasting (expensive for every entity every frame), the game uses a precomputed visibility matrix stored in a binary asset file that is de-serialized at startup.
The data structure
The pre-computed matrix is a HashMap<Integer, HashMap<Integer, Character>>. The outer key encodes an opaque tile’s position relative to the viewer as tileX * 100 + tileY. The inner HashMap maps each potentially obscured target tile to a char — used as a 16-bit bitmask — where each bit represents one of several possible lines of sight to that target. The bitmask encoding uses nibbles (4-bit groups), one per quadrant.
At runtime, the map accumulates which lines of sight are blocked by applying bitwise AND across all opaque tiles in the path:
if (obscuredLines != null) {
    numVisibleLines &= obscuredLines; // progressively mask blocked lines
}
If all bits are zeroed out, the target is not visible.
Unfolding 1/8 of the map
The precomputed data only stores visibility information for one octant (1/8 of the map — a triangular slice where x >= 1 and y < x). The remaining 7/8 is derived mathematically at startup using three passes of bitwise symmetry operations:
Pass 1 — Reflect across the diagonal:
for (int x = 2; x <= SCREEN_DRAW_SIZE; x++) {
    for (int y = 1; y < x; y++) {
        for (Entry<Point, Character> entry : visibileLinesMatrix[x][y].entrySet()) {
            Point key = entry.getKey();
            visibileLinesMatrix[y][x].put(new Point(key.y, key.x),
                swap(entry.getValue(), 2, 1));
        }
    }
}
Pass 2 — Flip vertically.
Pass 3 — Mirror left/right. Each transformation requires rearranging not just the coordinates but also the bitmask, since the directional meaning of each bit changes when the geometry is reflected. The swap() function handles this:
static char swap(char x, int i, int j) {
    return (char) swapNibbles(
        swapBits(swapBits(swapBits(swapBits(x, i, j),
            i+4, j+4), i+8, j+8), i+12, j+12), i, j);
}
The result: 8× storage savings, and all visibility lookups at runtime are simple array indexing.
Runtime visibility computation: shadow propagation from blockers
Once the precomputed matrix is loaded, computing what the hero can see at runtime uses an elegant inversion of the usual approach. Rather than asking “can I see tile X?” for each tile (which would require tracing rays to every target), computeVisibleLines asks the opposite question: “given that this opaque tile exists, what does it shadow?”
The algorithm starts by presetting every tile in the visibility window to fully visible (0xffff — all bits set). It then iterates over the rectangle of tiles within range. For each opaque tile it encounters, it retrieves that tile’s entry from the precomputed matrix — a HashMap mapping every potentially shadowed tile to a bitmask of which lines of sight it blocks:
HashMap<Point, Character> obscuredTiles = visibleLinesMatrix[i + offset][j + offset];
for (Entry<Point, Character> innerEntry : obscuredTiles.entrySet()) {
    visibleLinesChar[obscuredTileX][obscuredTileY] &= innerEntry.getValue();
}
Each AND operation progressively narrows the visibility of shadowed tiles. A tile with all bits zeroed is fully obscured. The final step counts the bits remaining in each tile’s visibility value using countNibbleBits() — the nibble with the most set bits determines how visible that tile is, since visibility is measured by the best available line of sight from any corner of the viewer’s square.
The result is that shadow propagates outward from blockers rather than rays being traced inward to targets — a fundamentally different and more efficient approach when the map contains many opaque tiles.
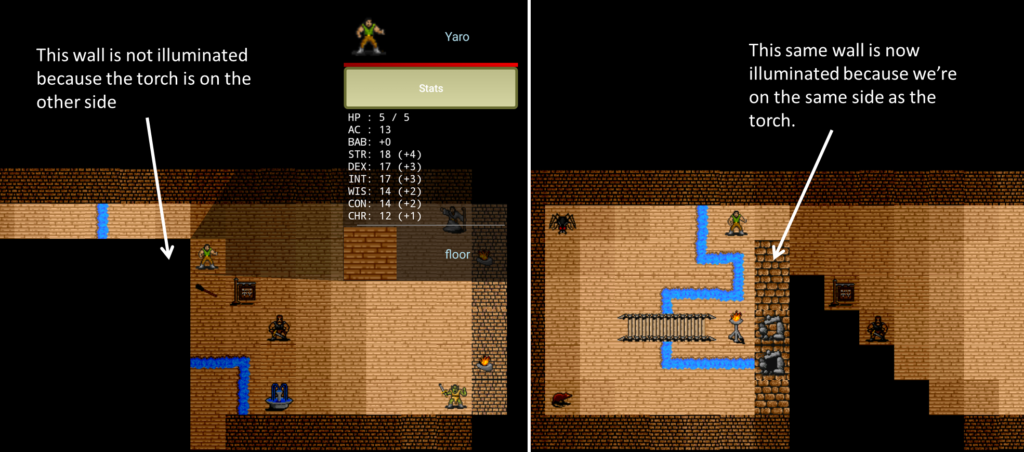
Illumination: inverse-square falloff with torch flicker
Light sources are modeled physically. Each Illumination object has a lumens value; the radius it illuminates is derived as:
lumensRange = (int) Math.sqrt(lumens / 10.0) + 1;
Within that radius, brightness falls off by the inverse square of distance:
lumensFlickerCache[x + lumensRange][y + lumensRange] =
    (lumens + randomLumens) / 4 / ((x*x) + (y*y));
The randomLumens value introduces flicker, throttled to 2 fps to mimic realistic torch behavior without burning unnecessary CPU. Illumination is combined with the visibility matrix — a tile is lit only if the hero can see it and the light source can reach it, meaning walls properly block torchlight.
Initiative and tie-breaking: encoding rules in decimal places
Pathfinder determines combat order by rolling d20 and adding modifiers, with ties broken by the highest DEX modifier. Rather than implementing tie-breaking as a special case in the combat sorting logic, the initiative system encodes the tie-breaker directly into the decimal portion of a float:
float initiative = init_d20 + initModifier;
initiative += (float) (initModifier + 50.0) / 100;
initiative = (float) Math.round(initiative * 100.0) / 100;
The integer part of the float is the standard initiative score. The decimal part encodes the DEX modifier shifted up by 50 (to handle negative modifiers) and scaled to the hundredths place — so a +3 DEX modifier adds 0.53, while a -2 adds 0.48. Higher modifier always wins a tie, exactly per the rules.
If two combatants still collide after that — identical roll and identical DEX — the code nudges one of them by a random ±0.01 until the collision is resolved:
while (combatants.containsKey(newInitiative)) {
    newInitiative += ((float) GameApp.d(1, 3) - 2f) / 100;
}
The payoff: combat order is just a descending sort of floats. No special tie-breaking logic anywhere else in the codebase. The rules are baked into the number itself.
Attacks of opportunity
AoO is modeled faithfully to the Pathfinder rules. Each entity gets exactly one attack of opportunity per turn. The AttackOfOpportunity command enforces a strict set of preconditions — flat-footed entities can’t take AoOs, unarmed humanoids can’t, and you can’t AoO an ally:
public boolean isPossibleCommand(Entities source, Entities target) {
    return source instanceof Beings
        && source.canTakeActions()
        && combat.isCombatant(source)
        && combat.attackOfOpportunityAvailable(source)
        && ((Beings) source).getHostility() != targetHostility
        && (!(source instanceof Humanoids) || !((Humanoids) source).isUnarmed())
        && !hasEffect(source, FlatFooted.class)
        && Attack.isMeleePossible(source, target)
        && super.isPossibleCommand(source, target);
}
A* pathfinding with horizon clipping
The Path class implements A* with a Euclidean distance heuristic, restricted to a bounding rectangle around the direct line between source and destination, padded by 10 tiles:
int left   = max(min(start.x, dest.x) - EXTRA_SEARCH_DISTANCE, 0);
int top    = max(min(start.y, dest.y) - EXTRA_SEARCH_DISTANCE, 0);
int right  = min(max(start.x, dest.x) + EXTRA_SEARCH_DISTANCE, MAP_SIZE);
int bottom = min(max(start.y, dest.y) + EXTRA_SEARCH_DISTANCE, MAP_SIZE);
Movement costs are differentiated — axial moves cost 2, diagonal moves cost 3, occupied squares cost 100, and impossible moves cost 1000 — which steers paths around obstacles naturally.
Tile variation: filename-encoded randomization
Rather than needing a unique asset for every possible tile orientation, the game encodes transformation rules directly in the asset filename. At load time, the filename is parsed and transformations applied:
rot4— randomly rotate 0°, 90°, 180° or 270°rot2— randomly rotate 0° or 180°fliph— randomly mirror horizontallyflipv— randomly mirror vertically
So _wall_stone_brick_mediumdark_rot2_fliphv tells the engine this wall tile can appear in two rotations and two mirror states. _blood_splatter_red_3dots_rot4_fliphv can appear in any of 8 orientations. One asset, many distinct placements — a significant reduction in required art.
Decor: composable tile layers
The game supports a decor system that allows any number of bitmaps to be stacked on top of a background tile. A fence bitmap placed on a grass tile creates a fenced meadow. A torch placed on a stone wall creates a lit dungeon corridor. Trees, rubble, bones, streams — all implemented as decor layered onto backgrounds. This multiplies the visual variety of maps enormously without requiring composite art assets.
The Level Editor
Mortal Wayfare ships with a companion Java desktop application — the level editor — that makes map creation visual and interactive. The editor presents a 100×100 tile canvas on the left and a full sprite palette on the right. The palette auto-detects the most likely class for each tile based on its filename (an orc sprite defaults to the Orc class; everything else defaults to Decor).
Maps are saved as simple pipe-delimited text files:
x|y|Class|_tile_filename|rotationThat file is copied into the Android project’s assets directory and parsed at runtime to instantiate all map entities. Right-clicking a tile in the palette lets you rename it; the editor then automatically updates all map files and Android source files that reference the old name — a handy refactoring tool baked right in.
The spell system: reflection-based registration
Spells are discovered at startup by scanning the DEX file for any class in the spells package:
DexFile df = new DexFile(getPackageCodePath());
for (Enumeration<String> iter = df.entries(); iter.hasMoreElements(); ) {
    String className = iter.nextElement();
    if (className.contains("spells"))
        Spells.addSpellToList(className);
}
Adding a new spell requires only writing the class — no registration code elsewhere.
Battle simulation mode
The /battle slash command puts the game into headless automated combat. The hero is handed to the monster AI, and results go to battle_log.txt. A battleRenderMod parameter controls how often the screen actually renders — set it to 10 and only every 10th battle is drawn, making it practical to run hundreds of combats for balance testing or, eventually, reinforcement learning data collection.
Other notable details
Outdoor flood fill and daylight. Maps support a mix of outdoor and indoor areas. At load time, the level editor’s ~outside markers seed a scanline flood fill that propagates outward across non-opaque tiles, stopping at walls and ~inside transition markers (doorways, thresholds). Any indoor tile bordering an outside tile is automatically flagged and assigned an OutdoorIllumination effect — a special variant of the torch illumination system that uses the same inverse-square falloff and visibility checks to simulate daylight bleeding through openings, without flicker. Outside tiles themselves simply return full brightness, bypassing the illumination pipeline entirely.
Command stack with deferred execution. Commands are pushed per entity and popped each game loop tick, so combat animations play out frame by frame. All entity collections use ConcurrentLinkedQueue for thread safety between the game loop and UI threads. Outdoor border tiles automatically receive the same inverse-square illumination treatment as torchlight, unifying indoor and outdoor lighting under one model.
Character class progression as data. The four character classes — Fighter, Cleric, Rogue and Wizard — are implemented as Java enums, each carrying its complete Pathfinder progression tables directly in the enum constructor: hit die, skill points per level, base attack bonus and saving throw arrays. Multiclassing falls out naturally by summing across a HashMap<Classes, Integer>. No lookup tables, no switch statements — the rules live in the type itself.
The effects system. Status conditions like FlatFooted, Stunned, Poisoned and Dying are first-class objects that attach to and detach from entities cleanly. This is what makes the AoO precondition check so readable — hasEffect(source, FlatFooted.class) is exactly what it looks like. The same pattern handles everything from poison ticks to the dying/stable/dead progression.
Threading. The game runs a dedicated render thread (GameLoop) alongside the Android UI thread, with both touching entity state. Rather than locking, entity effect and special-effect collections use ConcurrentLinkedQueue throughout — a small architectural decision that quietly prevents a whole class of race conditions.
Total: approximately 14,200 lines of Java across 175 files, plus the level editor.